Preparing Files
Types of Files We Accept For Printing...
For quality purposes, we require that all files sent to us follow industry standard formats, as 300dpi, CMYK, with 1/4" (0.25") Bleeds...
So what does this mean? Read on..
We will only accept the following standard file formats:
TIF - JPG - PDF - PSD (with all layers flattened)
We DO NOT accept Quark, Pagemaker, Corel Draw, Word, or any similar formats. These formats may be converted to one of the standard file formats listed above. Instructions on how to convert these formats are included below.
Tips for Quality Output...
Although we check all of our customer files for general problems, we are not responsible for customers that submit artwork incorrectly. To ensure quality output, please read and follow all guidelines carefully! If you have any questions regarding your files, contact our customer care center.
Resolution
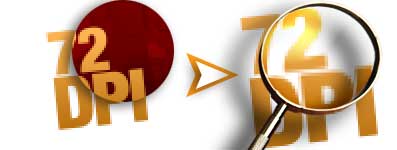
We require all submitted files to be 300dpi (Dots Per Inch). If you design a job at 72dpi or lower we cannot use the file. 72dpi images print blurry with jagged edges. See the example below where one image was created at the proper 300dpi, the other was created at 72dpi.
.jpg)
Bleed
During the cutting process, about 1/8” on all sides of your artwork will be trimmed off. This is considered "bleed" area. Make sure you do not have any important content in this area. Adjust your artwork to compensate for cutting by allowing an extra 1/8” beyond the finished size of your piece. (See Diagram Below, Also see Size)
Although our cutters are precise, we can not guarantee any print job to be cut accurately unless it has the proper bleed. There are no exceptions. Also, please keep your text at least 1/4" away from the edge of artwork. This way your text is in a "safe" area and won't be in danger of cutting off.
Safety ("safe" area)
The safety or "safe" area is the space where its safe to put your content including text.
.jpg)
.jpg)
Size
Your print files should be designed in the size that is being ordered plus 1/4" for bleed. We assume that you desire the size you selected and paid for during the ordering process. We reserve the right to re-size or stretch your artwork in accordance to the size you indicated. For example you ordered as a 4"x6" postcard but submitted a 4.25"x5.5" file. It is standard practice for us to stretch your artwork to print as the 4"x6" your ordered. Please refer to our Products pages for exact sizes and formats.
Borders
If your job requires a border, we recommend a minimum of 1/4" thickness on all sides in order to have your border appear somewhat even. Our cutters are very precise, however due to paper shift, we can not guarantee your borders would be exactly even on all sides. This is especially true for business cards.
RGB
(Red, Green, Blue) These are the colors your monitor uses to display everything. Do not send us RGB files as they will be converted to CMYK and color shifting may occur.
CMYK
(Cyan, Magenta, Yellow, Black) These are the colors used for printing. Your files must be submitted in CMYK format.
If you send us RGB files we will have to convert them to CMYK. This will cause a color shift. Color shifts are usually not visible in color photographs; however, rich and solid colors (like a background) can be affected by a color conversion from RGB to CMYK. Most of the time, color shifts are minor and may not be noticeable.

Using the color Black
Rich Black
Large, solid black areas and text over 36 points should use Rich Black (4-color black) to prevent the color looking gray. Rich Black consists of 30% Cyan, 30% Magenta, 30% Yellow, 100% Black. For regular body text, do not use Rich Black - use 100% Black (100% Black, 0% Cyan, 0% Magenta, 0% Yellow).

If you have small, thin text on your piece, it is STRONGLY recommended that you DO NOT use Rich Black on your piece. Although, using a 4-color black is recommended on larger areas, using rich black text on small areas will make your text blurry and at times, unreadable.
Full Color Printing uses 4 plates (Cyan, Magenta, Yellow and Black) that overlay tiny drops of ink in a precise mix and pattern to make your full color image. This pattern will vary slightly and shift naturally during the printing process. If you use all 4 colors to create your thin black text, this natural variation creates a ghosting effect because all 4 colors will not overlay precisely.
This is especially evident on small text, or small lines 12pt and smaller. In order to fix this, we require that all small text be created as 100% Black, 0% Cyan, 0% Magenta, 0% Yellow.
This picture shows an example...

Fonts
Convert fonts to outlines. By converting fonts to outlines in programs like Illustrator and FreeHand, you will avoid font issues such as missing fonts or missing text. When converting text to outlines, the font becomes a "shape" and will look no different than its original font.
In Photoshop, text can be rasterized and therefore does not need the fonts. Keep in mind that after rasterizing text, no changes can be made to the text so be sure to save your original file.
If your fonts are not converted to outlines or rasterized, your design may not be viewed the way it was meant to be seen.
File Names
In order to make processing your job more efficient, please use unique file names for the files you are submitting. File names should reflect the job name that was given when ordering. Example: JanuarySpecials_front.pdf
Using the Same Image on Both Sides
Let us know during the ordering process if you want your project printed with the same image on both sides. If we are not notified early in the project and receive only one file, your project could be delayed in order to locate the second file. If we receive two of the same file, your project could be delayed until you verify that both sides are to be printed with the same image.
Instructions For Exporting From Design Programs
Quark Xpress®
- From the file menu in Quark select: "Save page as EPS..."
- Name the file and press "Save".
- Open the Quark EPS file into Adobe Illustrator, "Select All" and go to the "Type" menu selection and "Create Outlines". All text on files must be converted to outlines with the outline set to zero to eliminate the need for fonts.
- Save file as Illustrator EPS with placed images included.
- Open Illustrator EPS file into Photoshop.
- In Photoshop set resolution to 300 dpi and mode to CMYK.
- Save files as "JPEG" or "TIF" with Maximum quality.
Freehand®
- Go to "Edit"; "Select"; "All" and then go to the menu selection "Text" then "Convert to Paths". All text within files must be converted to paths with the stroke set to zero to eliminate the need for fonts to be sent to us.
- Export file as EPS with placed images included.
- Open EPS file into Photoshop.
- In Photoshop set resolution to 300 dpi and mode to CMYK.
- Save files as "JPEG" or "TIF" with Maximum quality.
Adobe Illustrator®
- In Illustrator "Select All" and go to the "Type" menu selection and "Create Outlines". All text within files must be converted to outlines with the outline set to zero to eliminate the need for fonts.
- Save file as Illustrator EPS with placed images included.
- Open Illustrator EPS file into Photoshop.
- In Photoshop set resolution to 300 dpi and mode to CMYK.
- Save files as "JPEG" or "TIF" with Maximum quality.


